

No one sets off on a fishing expedition with failure in mind. We all desire to fill our creels when we hit the shores.
However, any seasoned angler will admit that fishing relies more on skill than luck. Even the slowest fish requires a considerable amount of stealth and patience to nail.
Fortunately, you can boost your fishing success rate by arming yourself with the requisite gear, including rods, reels, and baits.
Fishing baits come in many shapes and forms. The Parachute Adams fly has become popular with many anglers for its incredible versatility. This attractor fly can lure diverse fish species by changing its body color and orientation.
If you’re planning your next fishing trip but can’t decide on a suitable bait, you might want to add a Parachute Adams fly to your gear. Read below as we share more insights into this angling accessory.
The article shall briefly introduce a Parachute Adams fly before highlighting essential tips for tying the pattern.
Unveiling a Parachute Adams Fly
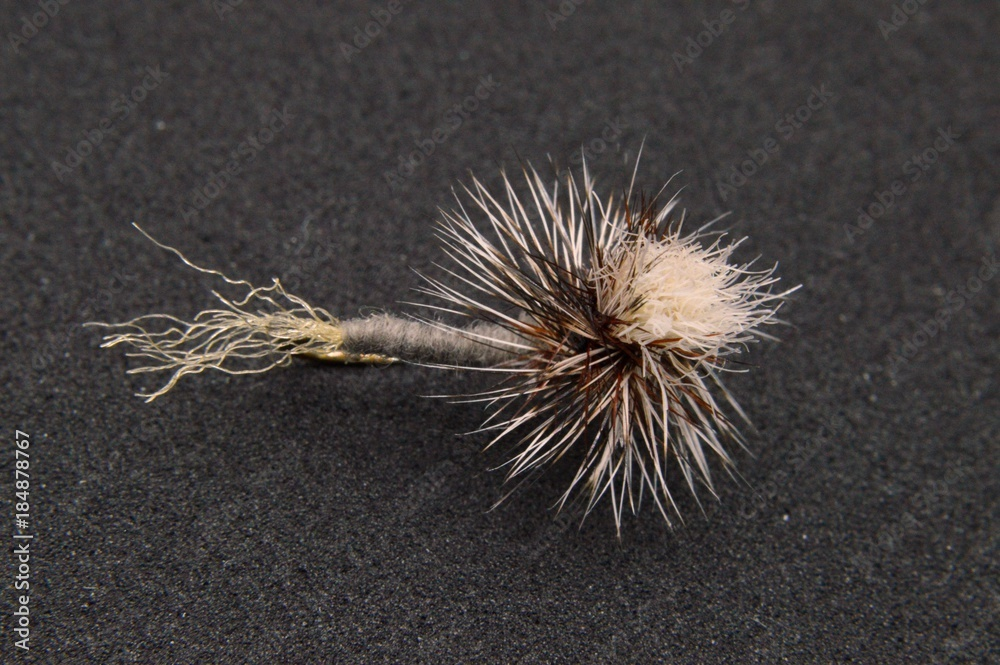
A Parachute Adams fly is a dry fly fishing pattern designed to imitate the appearance of multiple bugs, including mayflies, caddis, and midgets.
The Parachute Adams fly pattern is one of the most effective fishing items and can be deployed in various angling scenarios. Whether fishing in freshwater, saltwater, or muddy puddles, you can trust this fly pattern to deliver.
Another thing that sets a Parachute Adams fly from traditional Adams flies is its higher visibility.
True to its name, a Parachute Adams fly pattern comes with a parachute that sticks above the water surface as the actual bait sinks. This can improve your visibility, especially when fishing in unclear water.
Essential Tips for Tying the Perfect Parachute Adams Fly
1. Decide On the Shape and Color
The efficacy of the Parachute Adams fly depends primarily on its ability to imitate a wide variety of water inspects. So, it’s important to consider the pattern’s appearance when tying it.
Be sure to match your Parachute Adams fly with the size and color of the bugs that fish commonly prey on. These include mayflies, dragonflies, stoneflies, damselflies, alderflies, and dobsonflies.
Presentation is another critical aspect when tying the Parachute Adams fly. A pattern with a drag-free drift might lure even the most cautious fish into the bait.
Remember to properly size your Parachute Adams fly too. The pattern should be about the adult size of the insect in question.
2. Establish the Base and Tail
After picking the right shape and color for your Parachute Adams fly, begin tying the pattern by establishing its base and tail. You can create the base by running the thread along it before proceeding to the tail.
A Parachute Adams fly tail comprises grizzly and brown hackle fibers. The two sets of feathers should blend uniformly to resemble the real insect.
Combine the feathers into an even pattern by working them between your fingers.
Once you’ve achieved the desired uniformity, tie the feathers around the bend of the Parachute Adam’s shank. Complete the base and tail set-up by running the thread up about 70% of the shank’s length.
3. Set Up the Wings
The wings of the Parachute Adams fly typically feature white calf tail fiber.
Place a small amount of white calf tail fiber in a hair stacker to create the wings and clip off excess material from the tips. Tie the tail where you left off.
Next, create some wraps underneath the wings and several in front of it. Clip the ends of the rearward-facing tips and adjust the wings to point upwards.
Complete the process by creating several X wraps around the wing and the shank. Use the fingers of your dominant hand to gently work the thread up the wings, with the fingers of your non-dominant hand holding the tip ends of the fiber.
4. Give It a Realistic Look
Your Parachute Adams fly needs to appear as real as possible.
To give the pattern an authentic bug-like appearance, you’ll need to apply a pinch of any recommended dubbing material to the thread. Apply the dubbing sparingly to avoid overdoing it.
Once the material takes hold, wind the thread from the rear of the Parachute Adams fly below the wings. Give the insect a pronounced look by thickening the wraps when the thread hits the wings.
If everything looks fine, set the brown and grizzly saddle so the stems face upwards. Tie the saddle above the shank, just ahead of the wing, and clip off any excess material.
5. Wrap and Trim the Hackle
The final step in tying the Parachute Adams fly determines how you’ll handle the gear. It’s particularly important in improving the pattern’s tension and flexibility.
This process involves wrapping the Parachute Adam fly’s hackle clockwise while dragging the post upwards. When done, wrap the hackle downward, leaving small gaps around the pattern’s base for the CDC hackle.
Firmly secure the hackle using two thread wraps and clip any excess material.
Make a CDC brush, then create a distinct head for the pattern using some of the hackle from the post. You’re all done!
Summary
Tying a realistic Parachute Adams fly is only half the effort. The other half entails deploying the pattern properly. The trick is to exercise patience while fly-fishing with the Parachute Adams fly. Wait for the fish to bite down at the bait before reeling.